Roof Maintenance and Ice Dams in Alaska
Alaska roofs work harder than roofs almost anywhere else in the country. They carry thousands of pounds of snow, endure months of freeze-thaw cycles, face wind-driven rain and ice, and spend half the year in darkness that makes problems invisible until they’ve caused real damage. Ice dams alone account for some of the most expensive roof and interior repairs Alaska homeowners face each winter.
Understanding how ice dams form, what causes them, and how to prevent them can save you from water-stained ceilings, ruined insulation, mold, and structural damage. This guide covers ice dams, general roof maintenance, and the practical choices Alaska homeowners face when protecting the top of their home.
How Ice Dams Form
Ice dams don’t happen randomly. They form through a specific process driven by heat loss from inside the home.
The sequence:
- Heat escapes through the roof. Warm air from living spaces rises into the attic and heats the roof deck from below. This happens when attic insulation is insufficient or when air leaks allow warm interior air to reach the attic.
- Snow melts on the warm sections. The heated roof deck melts the snow sitting on top of it, starting from the areas closest to the heat source (typically the center of the roof, near the ridge).
- Meltwater flows to the eaves. The water runs down the roof under the snowpack toward the eaves — the overhanging edges of the roof.
- The eaves are cold. Because eaves extend past the exterior walls, they don’t receive heat from below. They stay at or below freezing.
- Water refreezes at the eave. The meltwater hits the cold section and freezes, forming a ridge of ice along the edge of the roof — the ice dam.
- Water pools behind the dam. As more meltwater flows down and gets blocked by the ice dam, it backs up. This pooled water can work its way under shingles and into the roof structure, causing leaks, rot, and water damage inside the home.
Key point: Ice dams are a symptom of heat loss, not a snow problem. A properly insulated and ventilated roof with two feet of snow on it may have no ice dams at all, while a poorly insulated roof with six inches of snow can develop severe ones.
Damage Ice Dams Cause
The damage from ice dams goes well beyond a few icicles hanging from the eaves. Left unaddressed, ice dams can lead to:
- Interior water damage — stained ceilings, wet walls, damaged paint and drywall
- Insulation degradation — wet insulation loses its R-value and can harbor mold
- Mold and mildew — moisture trapped inside walls and ceilings creates conditions for mold growth, which may go undetected for months
- Rotting roof sheathing and framing — repeated water exposure can compromise structural wood
- Gutter damage — the weight of ice in gutters can tear them from the fascia board
- Shingle damage — ice forming under shingles lifts, cracks, and dislodges them
- Fascia and soffit damage — ice buildup and water infiltration deteriorate these components
In Alaska, where snow sits on roofs for five to seven months, even a moderate ice dam problem compounds over a full winter season. A leak that starts in November may be causing hidden damage until April.
Preventing Ice Dams
Effective ice dam prevention targets the root cause: heat reaching the roof deck. The three primary defenses are insulation, air sealing, and ventilation.
Attic Insulation
Insulation slows heat transfer from your living space into the attic. In Alaska, recommended attic insulation levels are R-49 to R-60 or higher.
- Check your current levels. If you can see the tops of your ceiling joists in the attic, you need more insulation. In many older Alaska homes, attic insulation may be R-19 or R-30 — well below current recommendations.
- Blown-in cellulose or fiberglass is typically the most cost-effective way to add insulation to an existing attic. It fills gaps and irregularities better than batt insulation.
- Pay attention to coverage. Thin spots, compressed batts, and areas disturbed by previous work or storage are heat loss points. Consistent, even coverage matters.
- Don’t block soffit vents with insulation. Use baffles (cardboard or foam channels) to maintain airflow from the soffits to the attic space.
Air Sealing
Air leaks are often a bigger contributor to ice dams than insufficient insulation. Warm air rising through gaps directly heats the roof deck.
Common attic air leak points:
- Gaps around plumbing vent stacks and electrical wires passing through the ceiling
- Recessed light fixtures (especially non-IC-rated cans)
- Attic hatches and pull-down stair openings
- Gaps where interior walls meet the attic floor
- Ductwork running through the attic (both leaky ducts and gaps around duct penetrations)
- Chimney and flue chases
Sealing these leaks with caulk, spray foam, or metal flashing (for high-temperature areas near chimneys) can reduce attic heat gain dramatically. A professional blower door test can identify leaks you’d never find by visual inspection.
Attic Ventilation
Proper ventilation keeps the attic cold — which is what you want. A cold attic means the roof deck stays cold, snow doesn’t melt prematurely, and ice dams don’t form.
The ventilation principle: Cold outside air enters through soffit vents at the eaves, flows up under the roof deck, and exits through ridge vents, gable vents, or roof vents near the peak. This continuous airflow carries away any heat that does reach the attic and keeps the roof deck temperature close to the outdoor temperature.
- Balanced ventilation requires roughly equal intake (soffit) and exhaust (ridge/roof) areas. Many Alaska homes have inadequate soffit ventilation.
- Don’t mix ventilation types. Using both a ridge vent and powered attic fans, for example, can create conflicting airflow patterns that reduce effectiveness.
- Snow can block soffit vents. In heavy snow years, monitor whether snow buildup is covering your soffit vents and clear them if accessible.
Ice and Water Shield
Ice and water shield is a self-adhesive membrane applied directly to the roof deck under shingles. It provides a waterproof barrier that prevents water backed up behind an ice dam from reaching the roof structure.
- Building code in Alaska typically requires ice and water shield from the eave edge to at least 24 inches past the interior wall line. In practice, extending it further up the roof provides better protection.
- This is not ice dam prevention — it’s damage mitigation. The water may still pool, but it won’t leak into the house.
- Best applied during roof replacement or new construction. Retrofitting requires removing shingles.
For a complete look at preparing your home for cold weather, see our winterization checklist.
Dealing with Existing Ice Dams
If ice dams have already formed, you have a few options — some effective and some risky.
Roof Raking
A roof rake is a long-handled tool that lets you pull snow off the lower portion of your roof from the ground. Removing snow from the first 3–4 feet above the eave eliminates the meltwater source that feeds ice dams.
- Rake after every significant snowfall — don’t let it accumulate
- Use a roof rake with wheels or bumpers to avoid damaging shingles
- Work from the ground — climbing onto a snow-covered roof is extremely dangerous
- Don’t try to remove the ice dam itself with the rake. You’ll likely damage shingles and flashing.
Calcium Chloride
Filling a nylon stocking with calcium chloride and laying it across the ice dam perpendicular to the gutter can melt a channel through the ice, allowing backed-up water to drain. This is a temporary measure, not a long-term solution.
- Use calcium chloride, not rock salt. Rock salt (sodium chloride) can damage shingles, gutters, and plants below.
- This works slowly and may need to be repeated.
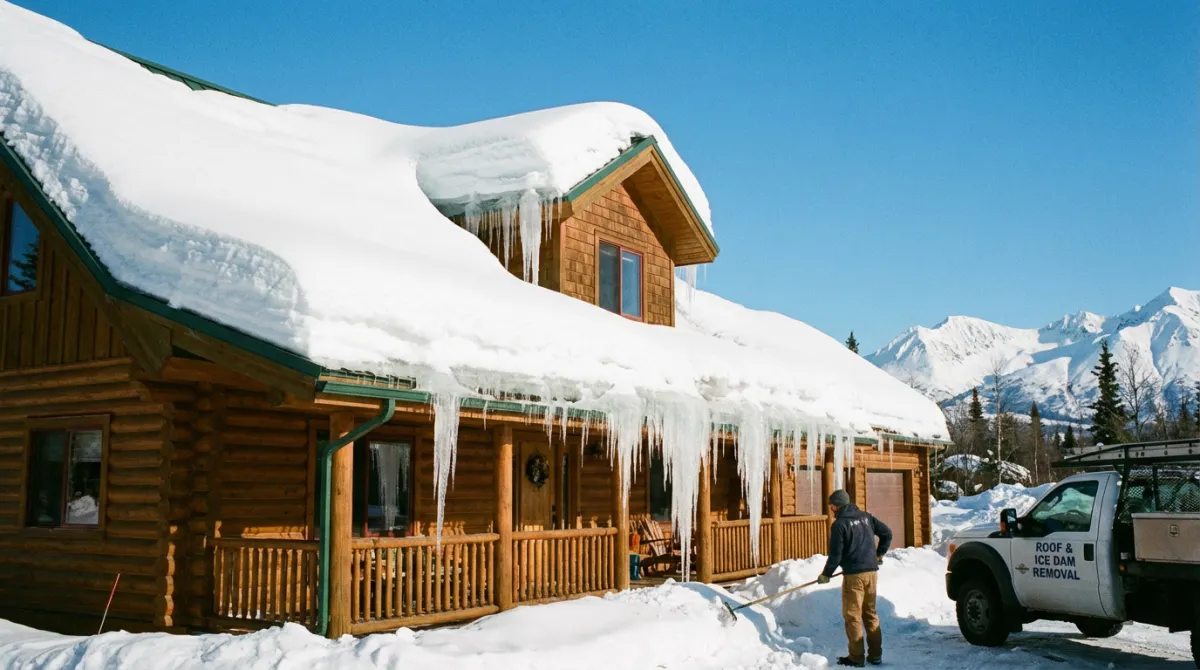
Professional Ice Dam Removal
For severe ice dams or ice dams on roofs you can’t safely reach, professional removal is the way to go. Professionals typically use low-pressure steam to melt ice dams without damaging the roof — a method that’s far safer than chipping, chiseling, or pressure washing.
- Cost: Professional ice dam removal in Alaska typically runs $300–$800 per visit, depending on the severity and roof accessibility.
- Don’t attempt to chip or hack at ice dams yourself. Axes, hammers, and chisels on a roof almost always end with damaged shingles, punctured membranes, or worse.
Metal Roofing in Alaska
Metal roofs have significant advantages in Alaska’s climate and are increasingly popular, particularly in areas with heavy snow loads.
Advantages:
- Snow shedding — metal’s smooth surface allows snow to slide off more readily than asphalt shingles, reducing snow load and ice dam risk
- Durability — a quality metal roof may last 40–70 years, compared to 20–30 years for asphalt shingles in Alaska conditions
- Ice dam resistance — the combination of a slick surface and proper underlayment makes ice dams far less common on metal roofs
- Fire resistance — relevant in wildfire-prone areas and for homes with wood stoves
- Low maintenance — no shingles to replace, no granules to lose
Considerations:
- Higher upfront cost — metal roofing typically costs $8–$15 per square foot installed, compared to $4–$8 for asphalt shingles
- Snow guards are essential to prevent large sheets of snow and ice from sliding off in dangerous avalanches. Snow falling off a metal roof can injure people, damage vehicles, and destroy landscaping.
- Noise — rain and hail are louder on metal, though proper underlayment and insulation reduce this significantly
- Finding an experienced installer matters. Metal roofing requires different skills than shingle installation, and poor installation leads to leaks and panel failures.
Snow Load Concerns
Alaska building codes specify minimum snow load requirements, which vary by location. Anchorage typically requires a design load of 50–70 pounds per square foot (psf), while some areas may require 100+ psf.
When to worry about snow load:
- Flat or low-slope roofs are most vulnerable because snow doesn’t slide off
- Older homes may not have been built to current snow load standards
- Uneven accumulation — drifting can create loads far exceeding the uniform design load in localized areas
- Heavy, wet snow weighs significantly more than dry, fluffy snow. A foot of dry snow may weigh 3–5 pounds per square foot, while a foot of wet snow can weigh 15–20+ psf.
Warning signs of excessive snow load:
- Doors or windows that suddenly stick or won’t open
- Visible sagging in the roof ridge or ceiling
- Cracking or popping sounds from the roof structure
- New cracks in interior drywall or plaster
If you notice any of these signs, remove snow from the roof promptly — or evacuate and call a professional if structural failure seems imminent.
Spring Roof Inspection Checklist
After every Alaska winter, your roof deserves a thorough inspection once the snow melts. Many winter problems are invisible until spring.
Exterior inspection:
- Check all shingles for cracks, curling, lifting, or missing pieces
- Inspect flashing around chimneys, vents, skylights, and where the roof meets walls
- Look for rust, loose panels, or failed fasteners on metal roofs
- Examine gutters for damage, sagging, or separation from the fascia
- Check downspouts for proper drainage away from the foundation
- Look for debris accumulation in valleys and behind dormers
- Inspect the fascia and soffits for water damage, rot, or paint failure
- Check attic ventilation openings for blockages or damage
Interior/attic inspection:
- Look for water stains on the underside of the roof deck
- Check for daylight showing through the roof (indicating holes or gaps)
- Inspect insulation for moisture, compression, or displacement
- Look for mold or mildew on framing members
- Verify that attic ventilation pathways are clear
- Check bathroom and kitchen vent fans to ensure they exhaust to the exterior, not into the attic
If you’re comfortable on a ladder and your roof is safely accessible, you can do the exterior inspection yourself. For steep roofs, multi-story homes, or if you spot potential problems, a professional inspection is typically worth the cost — usually $200–$400 in Anchorage or Fairbanks.
When to Call a Roofing Professional
Some roof issues can wait for a convenient time. Others can’t.
Call promptly if:
- Active leaks during rain or snowmelt
- Significant ice dam formation with visible water damage inside
- Missing or severely damaged shingles exposing the roof deck
- Sagging or structural concerns under snow load
- Flashing failures around chimneys or plumbing vents
Schedule for when convenient:
- Minor shingle damage (a few cracked or lifted shingles)
- Gutter cleaning and minor gutter repair
- Attic insulation and ventilation improvements
- Routine post-winter inspection
If you’re buying a home in Alaska, the roof inspection during the home buying process is especially important. Ask about the roof age, whether ice dams have been an issue, and whether the attic insulation and ventilation meet current standards. Replacing a roof is one of the most expensive home repairs, and knowing what you’re getting into before closing is critical.
Looking for a roofing pro you can trust? Find vetted roofing professionals on House Escort — the free app where Alaska home service pros keep 100% of what they earn.
Your roof is the first line of defense between your family and Alaska’s weather. Ice dams, snow loads, and the relentless freeze-thaw cycle test every roof every winter. Investing in proper insulation, ventilation, and quality roofing materials — and staying on top of maintenance — is one of the best things you can do to protect your home and avoid costly emergency repairs.
Frequently Asked Questions
What causes ice dams on Alaska roofs?
Ice dams form when heat escapes through the roof and melts snow on the upper sections. The meltwater flows down to the colder eaves where it refreezes, creating a ridge of ice that traps water behind it. Poor attic insulation and inadequate ventilation are the primary causes, and Alaska’s extreme cold amplifies the freeze-thaw cycle.
How do I know if my Alaska roof can handle the snow load?
Most modern Alaska homes are built to handle 40–60 pounds per square foot of snow load, depending on the municipality’s building code. If you notice sagging, cracking sounds, or difficulty opening doors and windows during heavy snow, remove snow immediately and have a structural engineer assess your roof. Older homes may not meet current load standards.
How much does ice dam removal cost in Alaska?
Professional ice dam removal in Alaska typically costs between $300 and $800 per visit, depending on roof size and severity. Steam removal is the safest method and avoids the shingle damage caused by mechanical chipping. Investing in proper insulation and ventilation to prevent ice dams is almost always cheaper long-term than repeated emergency removal.
What type of roofing material is best for Alaska homes?
Metal roofing is widely considered the best choice for Alaska because it sheds snow naturally, resists ice dam formation, and lasts 40–60 years. Asphalt shingles are more affordable upfront but require more maintenance and are more susceptible to ice dam damage. Your choice should factor in roof pitch, snow load, and local wind exposure.
Can ice dams cause interior water damage in my Alaska home?
Yes. When water pools behind an ice dam, it backs up under shingles and can leak into walls, ceilings, and insulation. The damage often goes unnoticed until mold develops or staining appears. Addressing ice dams promptly and ensuring proper attic insulation are the best ways to prevent costly interior water damage.
Need a Trusted Local Pro?
Find contractors, plumbers, electricians, and more on House Escort — the free app where pros keep 100% of their earnings.
Disclaimer: This article is for informational purposes only and does not constitute financial, mortgage, legal, or tax advice. Interest rates, loan programs, eligibility requirements, and fees are subject to change without notice and may vary based on your individual circumstances. Alaska Home HQ is not a lender, broker, or financial institution. All loan applications are processed by Premier Mortgage (NMLS: 1168048). We may have a business relationship with Premier Mortgage and may receive compensation when you use their services through our links. Consult a licensed mortgage professional before making financial decisions. Terms of Service · Privacy Policy